Showing posts with label crafts. Show all posts

25 February 2013

Making your own Light Tent for under 25$

When I was considering opening up an Etsy shop, one thing that I thought about was being able to take good, high quality photos of my products. It's so important to have clean, professional looking photos of products for advertising- especially when the customer is expected to purchase the product without ever getting to see it, touch it, or try it on in person! Dark, fuzzy camera-phone pics will just not grab the eye of any potential buyer.

I already have a very nice Nikon D40 DSLR which takes great photographs. However, without proper lighting and backdrop, the photos still wont look like "professional" quality. If you've ever wondered how photos of products with a smooth, bright white background like these pictures are taken...


...It's with a light tent! A light tent is typically a box large enough to hold small-medium sized objects for photographing. It is covered by fabric on the top and three sides, with one side left open. The back wall of the tent can be covered in fabric or paper, and curves smoothly into the floor to create a seamless backdrop with no edges or creases. The tent is the lit anywhere from one to all sides to get the lighting effect desired.

On amazon and photography shops, light tents can cost a pretty penny, sometimes up to a couple hundred dollars. This is not exactly a feasible option for someone starting a small online business! I decided, after a bit of research, to try my hand at making my own light tent for just a few dollars and about 45 minutes of construction time. Turns out it was really easy and the results were awesome!

The tutorial I used can be found here, but here's a basic rundown of the supplies and cost:

You will need
- a large, square-ish box. I got mine from work so that was free.
- 2 yards of white muslin fabric from Joann's or another fabric store. this was $1.25 a yard so only $2.50!
-2 large sheets of white bristol board, found near the yellow bristol drawing pads in the craft store- mine was a dollar a sheet. 2$.
-masking or packing tape, a ruler, a sharpie, exacto knife and/or scissors- assuming you already have these on hand, free.
- lighting fixture. I bought a clamp-on work light at home depot for $8.50. it's sturdy and works perfectly for what I need it for.
-light bulbs. I bought a pack of 4 100 watt "daylight" (provides bright white, rather than yellow light) bulbs for $8, also at home depot. 4 bulbs should last me years!

Total cost: 21$. Note that you can also purchase fewer bulbs, and if you already have an adjustable desk lamp (or any small lamp that can be moved around easily) you can omit the work light cost!

I'm really happy with how my light tent turned out. The quality is great! Here are a few example from when I was testing it out:


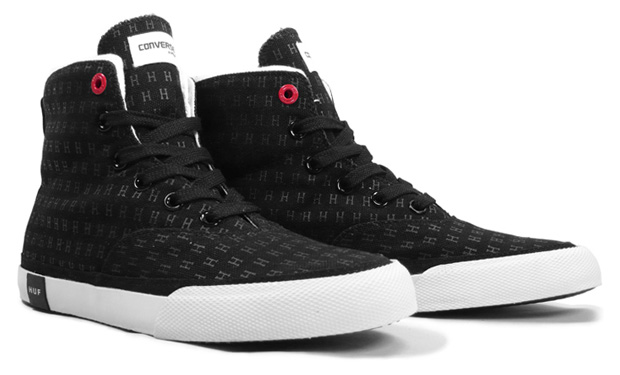
And here's the first product photo I took. It really helps the image appear clean and bright!
I'm really looking forward to continuing to use my light tent as I build up my shop. If you're interested in photographing products for a store or otherwise I encourage you to consider making your own light tent before you splurge on something you find online!

Have a lovely week!

Love, Em

04 August 2011

It's... Fall?

If you know me at all or have read more than like 3 posts on this blog, you'll know I'm a fall girl. I am all about autumn. I will talk your ear off about pumpkin patches and hay rides and knit skirts and leggings and scarves, and I will feed you pumpkin breads and stuffed squashes and hot toddies until you want to kill me and go live in bermuda or antarctica or somewhere where it is never fall, ever.

But even I have raised an eyebrow at all the fall-stuff that is trickling into the latest of the interwebs. Halloween cupcake decoration DIYs? Beef and beer stew topped with garlic bread? Cmon people- I can appreciate an icy beer here or there during these sizzling months, but beef? stew? garlic bread?! I've got at least another 2 good bikini months left so what the hell are you doing?

I love fall, but I'm not one to cut summer short either- unless it gets to be November in Tucson and it's still 85 degrees and green. Either way... fall will have it's time. the web loves fall. spice bread recipes, knitting patterns, thanksgiving cornucopia diys- bloggers eat that shit up. but for right now, it's still SUMMER, damnit. So I say we turn up our noses at all the autumn stuff flooding our blogs and tumblrs and pinterest boards and embrace all things summer!

Sangria is a total summer thing. It's perfect for garden parties, bbqs, or really anything at all because it's delicious. make some, stat.

I love using zucchini to make healthy "pasta" salads. you really can't tell the difference as far as taste and texture go, and you cut the calories by an absurd amount. This pesto pasta sounds delicious, refreshing, and oh so healthy :)

I'm kinda caprese-ed out, but if you need to get your summer fix of tomatoes, mozzarella, and basil drenched in olive oil, check out this recipe for cute little caprese appetizers I posted last summer.

Now is the time to be wearing flowers in your hair. I really want to go buy some cute fabric and plain headbands and make a million of these adorable rosette hair accessories!

I think this is the cutest idea for a tropical themed summer party. I'm one of those people that believes wreaths can be a year round ordeal ;)

go enjoy what's left of summer! take a roadtrip, go camping, take a beach/pool day, buy short shorts and bikinis and flirty yellow summer dresses. eat fro yo for dinner. lay on the grass and look at the stars. drink lemonade on porch swings. It's summertime, baby! and the livin's easy :)

<3
Em

28 December 2010

11th Day of Christmas

  Ok so I suck... I can't believe I went all the way to the 10th day of xmas and then got swept up in holiday madness and never posted days 11 and 12! for shame. Ah, well, at least I cranked 10 out on time. These next 2 days are quite belated but they're still cute ideas, so enjoy!

A long, long, time ago (before I was born) my parents made salt dough ornaments to hang on the christmas tree. Over time most of them have disappeared or broken, but there are still a couple floating around in our ornament boxes. I've always loved having a christmas tree with handmade ornaments on it- it makes it so much more special. This year we decided to make some new salt dough ornaments so that Jenny and I will have some of our own to put on our future christmas trees :)

Jenny did the dough making so I don't have a ton of pics, but I'll post what I have.

I think she used a recipe that called for mixing 2 cups of all purpose flour with 1 cup of salt and then slowly mixing in 1 cup of warm water. A ball of soft, pliable dough should form. It shouldn't be too sticky- if it is, add more flour. If it's crumbly, add more water.

There are two different ways to make salt dough ornaments. You can roll the dough out like you would sugar cookie dough and use cookie cutters to make 2D shapes, or you can shape the dough like clay to make tiny sculptures. We did a little of both, but the first way is pictured below. Don't forget to poke holes in the ornaments so that you can hang them on the tree!
Bake in an oven at 350 degrees for about an hour. Don't worry if they get a little brown, since you will be painting them. The ornaments are done when they are completely hard.
Let the ornaments cool, and then paint! Regular acrylic paints work best.
It might be too late to make these for this year, but salt dough creations can be fun all year long :) now hang on a sec and I'll get the 12th day of christmas up ^^
<3

23 December 2010

10th Day of Christmas

Today is yet another handmade gift post. The only person who can't read this is my sister :). This is an easy and super cheap idea, if you already have everything you need for the project (which, chances are, you will). The only thing that might be a little pricey is essential oil, but a little bottle of it will probably last you years. Other than that, this gift will cost you less than 5$ to make.

I'm talking about homemade bath salts. They're simple but they look (and smell) fancy and will last a long time. They are a great gift for anyone with a tub :)

You will need:
kosher or epsom salts- I used two large boxes of kosher salt to make three large jars and 1 small jar of salts. I had extra as well.
essential oils of your choice- I used lavender, jasmine, and "calm water" from the body shop.
food coloring
jars
ribbon for decorating
paper for tags

and that's it!

Start by washing out the jars you want to use.
Measure out the amount of salt needed to fill all the jars, and then divide the salts into however many types of essential oils you want to use.

To make the bath salts, add several drops of food coloring and several drops of one essential oil into the bowl of salts and stir until the color is uniform. When mixing colors (such as red and blue to make purple) mix the food coloring in a spoon first and then add it to the salts.


I decided to layer the different bath salts into the jars, but you could do one kind for each jar if you like.

22 December 2010

9th Day of Christmas

Mom, Dad, Sis, Don't read :)
Alright. Today is another handmade gift post. It takes a small amount of work, but with a sewing machine it takes literally like 5 minutes. I sewed by hand and the whole project took me only about an hour. I'm talking about handmade handwarmers! They're perfect for the winter months when it can be sooo cold outside. They basically look like little bean bags that you microwave for 30 seconds and then slip in your pockets or carry in your hands. You can also just lay them over sore muscles for some relief.
Making them is simple. Pick some fabric that you think the person you are making these for will like. I went to Joann and bought three squares of discounted leftover fabric- there are usually lots of cute options.


Cut the fabric into bean bag size rectangles- two for each handwarmer. pin the rectangles together, patterned sides facing each other, and sew up three full sides and all but 1 inch of the fourth side. Invert the sewed pouch so the the stitching is on the inside.

Using a funnel and a measuring cup with a spout, fill the empty handwarmers with regular dry white rice. leave some room so that the handwarmer is easy to hold on to and not too heavy. After it's filled, stitch up the open inch of fabric.

To use, microwave the handwarmers for 30 seconds. They should retain heat for about 30 minutes :)


29 October 2010

Halloween Countdown Day 3: So Now You Have a Pumpkin.

You may be asking yourself, "What now?"

Well fear not, I'm here to guide you through a painless, stress-free pumpkin experience.

lol.

Pumpkins are so versatile, aren't they? Bake them into pies and breads, roast them with butter, blend them up into a soup, and of course carve strange faces into them and set them on your porch.

I wish I had time to go through all the different things one could do with a pumpkin, but that would take waaaay more than one post. Today, I'll just be going over the use that everyone is probably seeing the most of these days: pumpkin carving.

27 October 2010

Halloween Countdown Day 5: Creative Costumes!

So, you may have gathered from the title that this is the first day of a Halloween countdown. If you've been reading this blog, you've probably noticed that I LOVE holidays. I also love countdowns, like the one I made for St. Patrick's Day earlier this year (and yes, each word is a different post). My FAVORITE holiday of ALL TIME, however, is the one happening this Sunday... Halloween!

It's funny because when I was a kid I'm sure my favorite holiday was something more like Christmas, where you get to wake up early and open presents and drink lots of hot chocolate. Halloween was less exciting, since I usually had to go to school that day and all you really do as a kid is dress up and go get a ton of candy. Now that I have the ability to be more creative with my Halloweens though, I can't get enough of them!